Wednesday, December 24, 2014

The Q-code

Hi there, sorry for the misleading title, this post is not about amateur radio, this still is about my photography adventures.

Coming from SLRs, I had severe doubts about the use of mirror-less system cameras. Yep, past tense, since the purchase of my first digital system camera, the Canon EOS-M my appreciation for mirror-less digital cameras changed. What triggered my initial interest was that the EOS-M employs an APS-C size sensor and no mirror to flip up and shake the camera. ("Haha", I here you thinking, "mirror, no mirror, what is this guy all about"). The initial plan was to mount the EOS-M behind a decent telescope, for astro-photography (makes sense now?). Whatever the EOS-M's reputation is, this is a very good camera, not only for video, but also for stills, despite the slow auto-focus.

From there, I moved down in sensor size (MFT aka m4/3), by getting an Olympus PM-2, which I love a lot.

Now my interest for mirror-less cameras was ignited.
Following the scene, it did not take long and I was intrigued by Pentax's Q system. Sooooo small! Well, also the sensor. Hence, I had my doubts, and stayed away from the Q.

And now, it struck me, the Q has got no mechanical shutter in the body, the sensor is back-lit, the firmware has got a built-in intervalometer and there are plenty of adapters available (including T2).
For astro-photography, the Q system might just be the thing!
Also, the Q-system sports in-body "shake reduction" by sensor shifting, allowing for manual/old lenses to be used with image stabilization.

So, I got one.

Now, out and about, I learned to love the Quirky little camera. Small enough to fit in any of my coats, including a wide arsenal of lenses.
Concerning which, I presently own the following genuine lenses:

  • 01 - standard prime (8.5mm f/1.9)
  • 02 - standard zoom (5-15mm f/2.8-4.5)
  • 04 - wide toy lens (6.3mm f/7.1)
  • 05 - toy tele-lens (18mm f/8)
  • 06 - tele zoom (15-45mm f/2.8)
  • Holga lens for Pentax Q (10mm f/8)
Some of the genuine lenses are supplied with a lens internal leaf shutter and a neutral density filter. Of course you know what that means... using strobes or speedlights at very fast shutter speeds.
When using lenses not equipped with a shutter, e.g. legacy glass of the toy lenses, shooting is entirely quiet, due to the electronic shutter. On the downside, the electronic shutter can be used up to 2s only,

By now, I also own a Q7 body. Despite the Q and the Q7 bodies have the most recent firmware, there are remarkable differences.
While the Q seems to handle a lot more easily, the Q7 got some feature I really miss on the Q.


Advantages of the Q
  • metal body, creating a very balance experience
  • intuitive dial customization
  • stereo audio in video recording

Advantages of the Q7
  • bigger sensor
  • records RAW when using smart filters or effects
  • slightly elevated buttons
There are probably more differences, but those are the ones that struck me most.
To me, it is impossible to pick a winner between the Q and the Q7. Although, the Q gets out a lot more often, probably because of the balanced feel of the metal body camera.

Another thought about the Q-system: C-mount lenses, which will fit the sensor just fine and can be really inexpensive.

Should you get a Q or a Q7? Well, I don't know! Just don't get a Q10, which is just a Q in a plastic body.

Saturday, December 20, 2014

Like Chinese Food?

Here are your free processing trays!
No joking here... honestly. I do like Chinese take-away food, and the particular restaurant provides me with free paper negative processing trays.
Right... let's talk about size. Size matters, doesn't it?
My next step in photography was supposed to be large format and it was. I obtained a LF studio camera for a decent (still high) price. For further adventure, I decided to also get a more portable view camera. Ebay-fate decided that my portable camera would be a Ihagee-Photoklapp Patent-Duplex. Anyway, talking about size, we need to consider 12x9cm. Although this size is considered "large format", it still feels somewhat small, in particular when having the developed paper negatives in hand.
Speaking of paper negatives, they look real good, however, the paper I used shows a lot of structure and even maker's marks and is therefore not suitable for contact prints.

left to right: caffenol - water stop - fix - wash
Yep, what you see are paper negatives in the fix and the wash baths.

The paper negatives scanned:
f/11 - 1s @ ISO 6
f/4.5 - s/4 @ ISO 6
The light leak on the bottom of both exposures is due to me having pulled the dark-slide out too far, thereby allowing light to leak into the cassette.

For you technical guys out there, I was using grade 4 matte paper.

OK, I owe you digital photos of the scenes, which I took with my Pentax Q and the 01 standard prime.

Pentax Q, 8.5mm f/8

Pentax Q, 8.5mm f/1.9


You will notice, there is much more drama in the large format photos.


Monday, November 24, 2014

Oh No! WD-40!!!

This post is not for the faint-hearted or any glove wearing gear lover!

I have not yet posted about my latest turn in classical photography, which brought me into large format. Yes, you read correctly, I am into large format now, more about that in a later post.

Along with a very nice Plaubel Peco Supra outfit came a 65mm Super-Angulon lens with a #00 Synchro-Compur shutter. All was fine with that shutter, but the slow speeds, which were gunked up.
"What do I care about slow speeds, since we have fast film!", you may think ... not so fast my friend. Large format lends itself to very slow film speeds, e.g. by use of photographic paper, rather than film. Now we are talking ISO 3-6 actually.
For me, the slow shutter just had to work!

So, I  decided to give a try and dismantled the Synchro-Compur, well, ok, I just took the lid and the speed-cam off.

First attempt to free the gears:
Zippo lighter fluid. Essentially, I swamped the entire mechanism with that stuff. Firing the shutter gradually freed the gunked gear and the slow speeds were coming up again. After some struggle with some springs, I managed to get the cam-plate back in place, closed the lid and had the shutter firing normally again. All speeds working! .... YEAH! Well ... not for long. 
The slow speed mechanism got sticky again a day later.
Cleaning with lighter fluid only did thus not do the trick!

Second attempt to free the gears (this is were real geeks should stop reading!):
WD-40 next to Duck-tape is the technicians best bet. Both are known for some severe and unwanted side-effects. Actually, the side-effects are somewhat similar, sticky gunk, which is difficult to remove!
WD-40 however, has the brilliant property to to loose old grime real good.
With the motto: no shutter is as good as a useless shutter, I tried to carefully spray some WD-40 into the stuck gears. Of course this did not go to plan... WD-40 ended up everywhere... in the shutter blades, on the aperture blades, etc. etc.
The result was, all shutter speeds ran extremely smooth! The volatile light highly viscous component of WD-40 did an excellent job.
Now, let's remove WD-40 as quickly as we can from the shutter.
In a first step, I flushed the shutter with Zippo lighter fluid.
In a second step (now look away if you are a purist!) I bathed (!) the entire shutter in medium hot water with a high a concentration of neutral (no perfume, no coloring) dish soap. Actually, I poured some of the dish washing soap right into the shutter and on the blades. Having done so, the entire mechanism experienced a dive, during which the shutter had to operate many time through all the gears (speeds).
Some time later, the Synchro-Compur experienced a hot shower of plain water, whilst firing, to be dried on a heating radiator a moment later.

Contrary to the first attempt of freeing the slow gears, the second attempt's result holds up. Fully dry, showing no signs of "lubricant", the shutter speeds, down to 1s, are just fine, finally, thanks to WD-40!?

Time will tell if I managed to also remove the heavy component of WD-40, which has the reputation to keep water away by greasing up, i.e. becoming sticky.

Use with care! Please understand the risks of using WD-40 in such delicate mechanisms as photographic shutters. Having warned you, I wont sign responsible when you messed up your $$$ camera mechanics.


Tuesday, November 18, 2014

Gary Fong Lightsphere Clone for Fuji EF-20

Nope, the following is not my idea... credits to Artur Gajewsk! Have a look:
DIY Gary Fong Lightsphere

Artur designed his diffuser for normal speedlites, the head of which can swivel. I must say, this design works very well! Please refer to Artur's article for the materials required.

Looking at the Fujifilm EF-20, which accompanies my X100S, things start becoming different.
First of all, although the EF-20 allows to tilt the flash 90 degrees upwards, there is no swivel possibility.
Secondly, the EF-20 is slightly tapered towards the business end.

So, I adapted the dimension as follows:
  • length: 23.5 cm
  • width: 12 cm
The width defines how well the diffuser wraps around the speedlite, while the length determines the aspect ration of the diffuser. The length is somewhat less critical, I figure 23cm or 24cm will do equally fine.
The constraint here is to employ an aspect ratio and orientation similar to the sensor in the camera, since the EF-20 does not swivel.

Since the flash is tapered, it is important to get as much friction as possible between the flash head and the diffuser. The rubbery material of the EF-20 is a good help here, since it is pretty sticky when used with the smooth side of the silicone lining material. The knobby side provides essentially no grip at all.

When building the diffuser, you hence want the flat/smooth surface inside. This might actually help the light bouncing inside the diffuser.

To mount the diffuser on the EF-20, you want to mount it on the front part of the head first and then slide it back to obtain good grip.

All in all, the first result look pretty promising!

A new addition to the bag, which easily fits into the bag's tablet compartment.

Friday, November 14, 2014

Fujifilm X100S Outfit Complete

The X100S has developed into my favorite camera, next to the Lumix LX7. This post is all about the X100S. Coming from mechanical SLRs, the silence of the leaf shutters is really pleasant. In a later post, I will write about film cameras with leaf shutters. The X100S, in addition to the super silent shutter, adds all the manual controls I am used to from my purely mechanical cameras.

For the camera to be useful beyond street photography, some additional accessories could come useful.
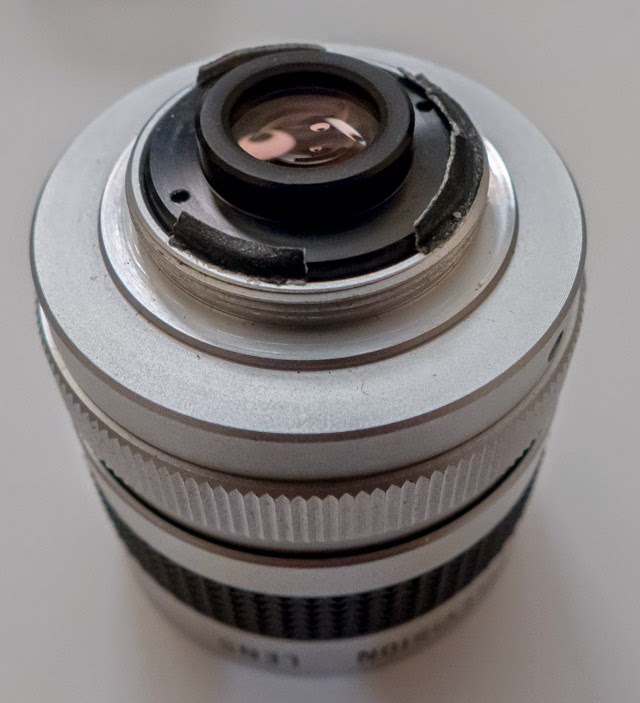
Portraiture Lens

The 63 degrees field of view, equivalent to a 35mm lens, is pretty ideal for photojournalism, showing the scene around the subject, slightly enlarging the center of the image, where the subject would be placed.
In portraiture, a slight distortion of the image center leads to unwanted effects, e.g. big noses and things of similar nature. Also, in portraiture, one actually does not want to show any of the surrounding scenery. Usually lenses between 90mm and 120mm (full frame equivalent) would do the trick.
The X100S, however, is stuck with a single lens.
To the rescue, Fuji provides 2 auxiliary lenses for the X100/X100S/X100T, a wide angle converter and a telephoto converter. For obvious reasons, the wide angle converter will not help for portraiture.
So, the telephoto converter (Fuji TCL-X100), is what we need to look at.
The TCL-X100 will result in an equivalent "normal" 50mm field of view. Although not ideal for studio portraiture, this is a starting point for taking portraits.

Off Camera Flash

The built-in flash is nice to have, however, it creates really harsh light and needs to be gelled (scotch tape) to diffuse and warm up the light a little.
Fuji offers 3 external flash units, one is ridiculously large, the second one provides a forward angle only, while the third and cheapest option (Fujifilm EF-20) can be pointed upwards in several angles. Still, even this flash would be sitting right on top of the camera.
Whichever option one choses, to get the flash off camera, one might use a flash remote cable. The contacts on Fujifilm's cameras' hot-shoes are similar to Canon cameras' hot-shoes. And in fact, Canon compatible flash cable work just fine with Fuji flashes, TTL and all.

There is a second option for off camera flash: RF (radio) remote triggers, my favorites! Note that radio triggers only work with manual flash settings.
Personally, I tested 2 different brands, both very inexpensive:
  1. WANSEN WS-603C
  2. YONGNUO RF-603C
The YONGNUO got 4+1 contacts in the hot-show (4 plus ground), while the WANSEN got 6+1 contacts.
The YONGNUO units have no problems to fire the Fuji flash, while the WANSEN units struggle. I figure that's got something to do with the Fuji flash's 4th contact, which is blanked out by the YONGNUO remote triggers. Actually, it turned out that one of the WANSEN units was bad, i.e. not popping the flash, whilst otherwise behaving normally.
My recommendation is still towards the YONGNUO RF-603C!

Filter Holder & Lens Hood

Yeah, I know, filters are for wimps! However, here comes your favorite camera, the lens of which cannot be exchanged... maybe here´s a reason to add a useless UV-filter, just to protect the front element of the non-exchangeable lens of your very favorite camera... makes sense?
Of course, you can get the Fuji-thing for about 80 Euros... or, you fetch one of the very cheap after-markets part (LA-49 X100). And screw on your favorite useless UV-filter!

Filters

However useless the protective UV filter is, there are some filters really useful to the X100S.
With a "circular polarizer" (which has actually nothing to do with circular polarization!), one can adjust for polarized light, such as reflections and polarization of the sky.
My X100S bag also holds a filter that is primarily used for astro-photography, a so called "sky glow filter". This filter blocks spectral lines of man made light sources, thereby enhancing starlight. Filters of this kind come for 2" eyepieces, which is in the same ballpark as the X100S filter holder. A small piece of tape interfaces between the filter and the lens' filter thread. There are more extreme filters, e.g. for hydrogen and oxygen lines, however, this would be taking it to the extremes.

Tripod

A decent tripod should be in any serious photographer's bag!
Full size tripods require some space, which the usual bag does not offer, hence, I went for the MeFoto DayTrip. For a price of next to nothing, you'll get a very sturdy, not too tall, tripod.

A Strap

Probably the last thing anyone would be concerned with is the strap used to hold the camera. What I am concerned, the strap should be the first consideration someone should half, after buying a camera.
My preference goes clearly towards the cross-body-style Black Rapid Strap and clones thereof.
I held SLRs, DSLRs and other cameras, including the X100S that way, ready to shoot in an instance! Very cool!

Cable Shutter Release

While this sound really outdated, the X100(S/T) sports a thread for a mechanical shutter release cable. Great stuff with an oldschool camera such as the X100(S/T). Great for really long exposures. That brings us back to the filters, in particular the ones used for astronomy.

Batteries and Charger

Digital cameras run on batteries, and batteries run empty occasionally. So, the more batteries available, the better. However, at some stage, batteries need to be recharged.
Again, the after market offers a really nice deal. PATONA offers a charger for multiple power sources, including 2 batteries for a very competitive price. The charger itself allows for charging from mains, USB or 12V (car) power sources, all necessary cables included! Not much more to wish for, I figure.

The Bag

Finally! I mentioned "the bag" sometimes, previously, and this is it:
The Urban Photo Sling 150 by LowePro.


The Entire Outfit

all items shown fit in the bag shown, actually, I forgot the cable shutter release....

Thursday, November 13, 2014

WANSEN WS-603C mod

The RF trigger transceivers made by WANSEN do a pretty good job. I use those in my Canon digital gear.
However, next to the digital stuff, I also shooting film. The cameras I use for this might have a hot-shoe... at max.
Wanna doe wireless with random and oldskool gear?
Here is the solution: get some WANSEN WS-603C an modify those. No, this is not my idea, I found this guy who modified a Yongnuo RF-603N trigger system this way. Here's another chap showing a modification of a RF-603C in video.

The mod add 3V via a 100kOhms resistor to a pin of a multipole hot-shoe. The 100kOhms resistor would be called a "pulled up", i.e. pulling up the potential w/o adding the current. A very safe bet for any electronics.

The WANSEN units seem to be slightly different from the Yongnuo units. So, take care to modify your RF trigger in an appropriate way. Actually, within different WANSEN units, the wiring is different!
I have to say, that my mod is pretty tolerant to various layouts of the main PCB, since it is oriented on the PCB assigned to the hot-shoe.

the pin on the hot-shoe sensing the presence of a camera

here the pin ends, in the middle!
One can attach the switchable pull-up on either the hot-shoe, or the main PCB.
For reduced confusion, I decided to apply the pull-up to the hot-shoe.
Looking out for "done work", I decided to remove the 3.5mm trigger socket, to make place for a switch. One of the terminals of said switch came conveniently close to the hot-shoe's PCB's solder patch for the relevant pin. A very short piece of wire connects the switch with pin, enabling "pull-up".
The green arrow of the following picture indicates the location of the added pull-up resistor.
the mod asks for a 100kOhms pull-up resistor (connected to the battery terminal)
The unit functions as a flash-trigger now... that's the supposed primary use.
Many modern cameras require their very own speed-light systems. Modifying existent systems, such as the WANSEN or Yongnuo, may not provide TTL metering, however, those system form a perfect alternative to the overpriced PocketWizzards.


Actually, I use those trigger to pop a remote flash with an AGAT 18k.

receive mode, all three
device in the middle set to transmit (cf. green LEDs)


Beneficially, the WANSEN and the Yongnuo system are fully compatible in terms of functions.
Personally, I got 2 Yongnuo units and 4 WANSEN units...I will have a hard time figuring out how I can use 5 speedlites....


Thursday, October 30, 2014

C-Mount Lenses for MFT Cameras

This topic can be found online all over the place. Cheap and cheerful C-mount video lenses on micro-4/3 (MFT) systems. In particular BMPCC users seem t love those lenses.
Some months ago, I bought my first C-mount lens, a 25mm f/1.4, which was fun to play with for a day, but quickly found its way in the bag to stay there.

Recently, I came across 2 more lenses which caught my attention, ad 16mm f/1.6 and a 35mm f/1.7.

Here is a photo of my C-mount lenses, the MFT adapter and 2 macro-rings, which came with the 35mm lens.
16mm, 25mm and 35mm lenses, respective adapter and macro-rings

The 35mm Fujian immediately became my favorite. The 70mm equivalent fast glass makes a beautiful portrait lens! At f/1.7, the aperture is perfectly round, creating wonderful Bokeh-balls. Down to f/4, the aperture stay reasonably round. At f/5.6 a slight zig-zagy-ness crawls in, which stay down to f/16, which is the official end of the scale. However, the lens can be stopped down further, with the aperture getting more and more rectangular.
The adaptation of the Fujian, using the adapter ring shown above, was no problem at all. Actually, the moves beyond the infinity focus.

The 25mm I did discuss previously on this blog, so I will skip this particular lens here.

Finally, the 16mm Cosmicar... Honestly, I had my issues with this lens!
It is clearly visible from the image above, the Comsicar is the biggest of them all. Not sure why the lens was build that way, since the front-element is hidden deeply inside the huge lens-hood.
Using the shown adapter, the Cosmicar could be focused on extremely proximate objects only, meaning, it did not screw all the way into the adapter, I figure.
At this point in time, I thought I just wasted €20, made my peace with it a put the lens aside.
For an unapparent reason, I picked the thing up again and had a look if it could not be modified (to serve whatever purpose... e.g. put in front of a webcam, for long-exposure astro-stuff.
When looking at the back of the lens, it seems that the rear lens group can be unscrewed. There is not actual image of the unscrewed lens group, sorry! The process of unscrewing the group took a long way, which gave me the idea, that the group could be fixed at a place where the lens would focus on my MFT sensor. After some trial and error, I found the infinity focus position.
For the time being, said infinity focus position is fixed by small stripes of gaffer's tape stuffed in the threads.
Cosmicar 16mm f/1.6 with displaced rear lens group
Of course, I could have dropped in a bit of Loctite, to secure the position... however, I am not yet sure if I want things to be like this, hence, I decided for a temporary solution.
Optically, and in terms of handling, the lens is fine. The equivalent 32mm are too short for comfort, however. The lens shows black vignetting, indicating that the image is too small for the sensor.
Olympus added a "digital tele-converter" function to their E-PM2, which I used for the tests. Here, the lens displays a decently flat image over the entire frame. When shooting in RAW, this does not help at all, in contrast to shooting video.
The Cosmicar being a very smooth lens what controls are concerned, will probably be the best of the bunch for video work, provided Olympus' digital tele-converter is used.
For use with the BMPCC, which is provided with a smaller sensor, this lens my just be the hero... the 20 bucks hero that is.

Poppy-Uppy Flash Mini Soft Box

Lately, I have been asked by some friends, why the flash of their compact camera creates such "crappy" images. Assuming that the problem was flat images with lots of hard shadows and a cold color cast, my answer was always the same: the tiny built-in flash-tube create really hard light.
Hard light, i.e. light that comes from a light source being (much) smaller than the subject, creates a flat appearance and pretty harsh shadows in the background.
Using the built-in, is therefore only good for "fill flash" when shooting in bright (sun) back light.

There are a very simple solutions to make most of the flashes useable, even with the tiny flash being the only light source.
  1. diffuse the flash
  2. redirect the flash
  3. tone the flash
  4. redirect the flash with a tone
Options 1 and 2 are obviously referring to making the light softer, which cannot be corrected in post processing, while options 3 and 4 are just an added bonus, and can be added in post.

Options 1, 2 and 4 can easily be achieved by a very simple device... a translucent film canister.

the translucent canister

One simply has to create a template of the cross-section of the poppy-uppy flash's footprint and create a corresponding cut-out in the canister. The cut-out should actually be a bit wider, so that the canister can lean a bit to the front of the camera.
Somewhat like this:

template and modified canister

Going from here, the optional reflector can be created. I experimented a bit with the dimensions of said reflector. And here is my solution:
  • length: 43mm (fitting the canister lengthwise)
  • width: 23mm (creating a 45-ish degree angle)
the internal reflector

The reflector inserted into the "soft box" looks somewhat like this (red side up):

the internal reflector inserted into the soft box

And there are some of the resulting images, showing one of my messy book shelves. The LX7 was on aperture priority f/2.8 @ ISO1600:

reference shot, bare built-in flash
diffuser (no internal reflector)
white side of the internal reflector
red side of the internal reflector
The difference might be hard to see on the given examples, in particular since blogger will "improve" the photos again, I fear.

An assortment of different reflectors, such as different colors, aluminum foil, etc. can make the mini soft box really useful.

Enjoy photography!

UPDATE:
The original design gave a lot of spill towards the back of the camera. To keep this a bit under control, I attached aluminum tape to the inner backside of the canister,  such that is directed more towards the upper front.


Saturday, October 25, 2014

Updated Chardonnol Recipe

Presently, the C41 film is drying.
So far, results look OK, still a little faint though.
I overexposed the film by 2 stops...

Right, here is the recipe:
1/4l Chardonnay
1 tsp ascorbic acid
3/2 tsp soda

I developed for 20 minutes, with agitation ever minute.

As soon as the film is dry, I will scan images and present those here.

Thursday, October 16, 2014

Mechanical Cameras (chemical that is)

Some time ago, I got myself a collection of 4 "untested" (i.e. defect) vintage cameras for real cheap from a world renowned auction site.

The jewel of the collection was a Minolta A5, with a jammed shutter (blocking the film advance lever). I slowly pealed the layers off that thing, and like an onion, it presented the guts, ever so slowly. Finally, I got the lens barrel holding the shutter mechanism separated from the rest. Some tweaking even got the shutter back to work... However, to the present day, I was unable to reassemble this particular camera.
Main problem: I can't get the lens back into the threaded mount. Potentially this camera is a total loss :-(

Second in place was an Argus C3. This camera had a problem with the cocking mechanism, which opened the shutter incidentally. Not good, that for sure. Also the tripod mount was fill with a broken off screw, which is not good either.
The quick fix for the shutter cocking mechanism was to tighten up the shutter release and fix it in the timed position. OK, now, the bulb mode is gone ... but what is a bulb mode good for, if you can't use a tripod? Mind you, the broken screw in the tripod mount.

In third place, a Fujica Half. Actually, this camera was the main driver to place a bid! Again, the shutter was jammed, blocking the film advance lever, similar to the Minolta A5.
Seems that fixes are much simpler with the Fujica. Carefully removing the black rubber, the front-plate of the camera, which is held by 4 screw only, can be easily removed. W/o the front cover, the shutter release mechanism is exposed. Upon wiggling said release a bit, it loosened up and finally released, allowing for cranking the shutter.
The Fujica Half is back in business! Even the automatic exposure stuff seems to work.

The forth and final camera in the bundle was some cassette film plastic thingy not worth any further mention....

At the end, 2 out of 4 cameras a working fine. A third may potentially be rescued, although, I doubt if there is any incentive to rescue this particular Minolta A5 over just trying to get a working one for cheap.

Long live 135 film!

Tuesday, September 2, 2014

Load 135 Film Correctly

Lately, there are many videos on FaceToob and YouBuke telling people how to load 135 film... guess what most of those are plainly wrong. (Search for "load 135 film" and see for yourself!)

Well, of course you can put the cartridge in the camera first. That means that now you got to pull out film and fiddle it into the take-up spool. Well, since the film is somewhat stiff, and you already set a constraint, things are more complicated from here on, in particular since now the perforations have to be matched to the film sprocket. This way, and this is what you can see on those videos, people make sure that all is fine by cranking some frames just to watch the film exposing and winding on the take-up spool.

No, I am not going to shoot a video, not yet...

However, here is how I load a film (assuming the usage of a camera in which the film cartridge goes into the left hand side).
  • hold the (open) camera in the right hand
  • pull out the cartridge axle
  • press the film rewind button for a free-wheeling sprocket
  • hold the film cartridge in the left hand between palm and middle finger, ring finger and pinky
  • hold the film leader with thumb and index finger
  • now you have all the dexterity to smoothly insert the film into the take-up spool's retaining mechanism
  • with the thumb of the right hand, hold the film in the take-up spool's retaining mechanism
  • gently pull the film across the sprocket (it will self align, since it is free) and across the exposure chamber, using your left thumb as a brake
  • gently slide the cartridge into it's place
  • now, hold the camera with your left hand, the thumb still resting on the film, this will ensure no unwanted movement
  • with the right hand, gently push in the cartridge axis
  • with the right hand, very gently (!) crank the film "back", i.e. into the cartridge, in order to straighten out the film - if the film does not slip out of the take-up retention mechanism all is fine
  • now close the camera
  • crank forward 1 frame (which will be partially exposed during the loading) and observe if the backwinding crank moves correctly and the rewind button pops out
Although the method above seems to involve a lot a steps, with some practice, this is the fastest method to load a roll of 135 film.
It also is the most economical method, usually it get's me about 40 full-frames and 81 half-frames from 1 shop-bought cartridge. (With the BelOMO Agat 18k this method will result in 82 half-frames).

I already mentioned one less common camera, the Agat 18k. There are other cameras (in my collections) such as the Argus C3, which may require either taken 'em up-side down of reversing the hands. I tend to just use the other hand...

Just remember, the cartridge goes in last!

PS: Wow, I found 1 video explaining film loading the correct way:
https://www.youtube.com/watch?v=OSoDNrxTWjs
Congrats to expert village!

PPS: Unbelievable... the same channel:
https://www.youtube.com/watch?v=uXKTgaM8HBg
Oh boy!


Friday, August 8, 2014

The Poor Man's Leicas - The Petri 7 S & The Fujica Half

Yet another post about film on my blog... sorry you electronic (aka digital) shooters, I have a topic prepared for you too. However, since I rediscovered my love for CHEMICAL (!!!) or "wet" (for good measures) photography, I would like to focus on that stuff today.

Before actually diving into today's topic, I would like to shortly discuss the misuse of the attributes in photography. Nowadays, photography using CCD of CMOS sensors is called "digital". There is nothing digital about collecting charge created by photons in a photo-diode! Believe me, this is an analog process. OK, if you want to be really picky about things, Planck has got the last word, and yes, the collection of photons is quantized. Quantization, however, is not an synonym to digitization. In fact, in the photosensitive emulsion of a film, the same quantum electro dynamical processes are taking place as in the die of an electronic light sensor.
The difference between film and "digital" cameras lies in the recovery of the "latent image".
In "digital" photography, the latent (analog) image is read out electronically (analog) by a CC (charge couple) process, or by process similar to access memory in a computer ("CMOS") and digitized by a ADC (analog to digital converter).
In film photography, or "analog" for those who insist, the latent image is processed and fixed by chemical reactions.

With that out of the way, let's talk about the poor man's Leica!

In my time (my youth that is), I had a lot of fun playing with traditional photography, using 135 film. The dark room was my second home to the time. First in school, later at home. Film photography, however, needs some dedicated space, which I was not available to me any longer when I was at university. Hence, the entire action came to a hold... none of my cameras/lenses was of any use any longer. Actually, I was not taken any substantial amount of photos for nearly 30 years!

Digital cameras just lately came close to what I expected. And only with the purchase of the Fuji X100S, the spark was back!
I know, I did not share a lot of my Fuji X100S experiences here, but I can tell you, the possibility to use it in full manual mode, just like a camera I grew up with, brought me back to film.
You may have noticed my earlier posts about the "sunny 16 rule" and how to determine exposure.

Now I was aiming for a shooting experience like the X100S using film.
My SLR's (all of them) are pretty noisy. Hence, I was on the hunt for a camera that is quiet and fully manually controllable.

You would be surprised to know, there are not a lot cameras out there to fulfill such a simple requirements!
Many legacy cameras involved some sort of automation, be it shutter, be it aperture. Yep, this is exactly what I was not looking for.

After a long search, I ended with one camera that I really love, and another one that will be my workhorse.

Let's start with the workhorse: the Petri 7 S. This camera comes in various flavors, all of which employ a range finder and full manual controls. The shutter speed ranges from 1s/500 to 1s, while a bulb mode is available. Depending on the model, apertures from f/1.8 to f/16 are available. I personally own 2 cameras with an f/2.8 lens, and a third camera, having a f/1.8 lens, is on it's way.
I shot several rolls of film with my Petri's and I am very pleased with the results sofar. Really silent cameras.

The Petri 7 S is very easy to maintain. Cleaning the viewfinder and the rangefinder might be necessary, infos can be found here.
There is a service manual available for free.
Actually, I opened both my Petris and cleaned / aligned the viewfinder / rangefinder.

Still more on the Petri 7 S: They made an auxiliary lens kit for those cameras. The kit came with a wide angle attachment, and telephoto attachment and a cold-shoe viewfinder. The attachments screw right on the 52mm filter thread of the Petri 7Ss' lens. Actually, there are folks who use those AUX lenses on X100(S) cameras with a respective filter thread adapter.

Leaving the Petri and moving on to my very favorite camera today, the Fujica Half 1.9!
The Fujica Half is not a real replacement of any Leica or other type of range finder cameras ever made. There is no range finder on that camera! Although there is a lever for focusing, typical to a range finder. In the viewfinder, one will see an indicator for  "mountains", "a couple" and "portrait".
In theory, the Fujica Half has got a light meter... well, the light meter of my camera is dead.
No light meter, no range finder... why is this still my favorite camera as of today?
I am not even using it's wide open f/1.9 aperture as often....

The Fujica Half offers the opportunity to re-think framing. In it's normal position, the Fujica is in portrait mode. When you think of it, portrait is much more natural to photography than "landscape" (unless one photographs a landscape...).

The Fujica offers the same exposure options as the Petri 7 S, however, being "half frame", the Fujica offers twice the amount of exposures on one 135 film.

Next in the line: AGAT 18k (waiting for it to arrive).

Saturday, July 26, 2014

Fujica Half 1.9 - Caffenol - First Scans

As previously announced, the only thing to wait for was the film to dry.

Half frame cameras seem not to be known to today's scanner manufacturers... the scanner software insisted in scanning 135 film full frames.
The following images are results of scanning the negatives with an Epson Perfection V370 Photo.
Resolution 4800 dpi at 16-bit grayscale. The scanner's software does some automatic settings, which I reset in order to have a linear scan.

as output by the scanner - scaled using the GIMP

some adjustments in LR - scaled using the GIMP
Not sure how accurate the first image reflects the scan, since the GIMP converted from 16-bit to 8-bit.
When I look at the actual negatives, they seem perfectly fine for dark room printing, just like the films I developed previously using commercial film developers.


Interesting about half-frame cameras, one tends to pay more attention to portrait shots, which is an interesting experience. Before I obtained this camera, most of my photos were horizonticals, i.e. landscape shots.

Concerning the camera, I would like to point towards this link: "Fujica Half 1.9". The one that I got has a broken light meter, no problem thanks to the full manual control.

In the course of time, I might write some more about the camera. Next plan: shoot a C41 film and have it professionally developed... let's check the chromatic qualities of the f/1.9 lens.

Caffenol-CM(RS) for Jobo 1510 Tanks

That's more a note to myself than any tutorial or recipe. However, the post should contain enough information to just follow what I did, if you want to try it yourself.

My recent acquisition, a Fujica half 1.9 was used to expose a Fomapan 100 b&w-negative film. The film was exposed too ISO 100. The film is currently drying, I will show scan/prints in future posts, stay tuned.

I do actually not claim the following recipe, I adopted Jon Caradies' volumetric version of caffenol (see "The Caffenol Cookbook") to volumes to work with the 240ml Jobo 1510 developing tank.

Measurements
Something important about volumetric gauges, such as TBSP or TSP. Although TBSP bears the meaning of "table spoon", while TSP would refer to "tea spoon", such measures are actually referring to small hemispherical measuring devices and not to actual table or tea spoons. The actual spoons may vary in volume, so, please don't use those as a reference. For more info, check wikipedia.

Temperature
The following happened at July room temperature (26°C).

Developer
Here it comes, 2 vessels required:
  • dissolves 2 TSP of washing soda in 100ml of water
  • add ¾ (3 quarter) TSP of vitamine-C to the washing soda solution
  • dissolve 2½ (5 half) TSP of (cheap) instant coffee crystals in 140ml of water
  • => wait until dissolved or bubbling stopped
  • pour the coffee solution slowly into the soda/vit-C solution
  • add ¼ TSP of iodized table salt
  • => wait for at least 5min, or activity stopped (no more froth)

Process
  • Soak film in room-temp water for 5 min.  
  • Developing for 13min, 10 inversions during the begin of the first minute, 3 inversions at the begin of every other minute.
  • Stopping by 3× rinsing with room-temp water.
  • Fixing using Ilford Rapid 1+4 for 3min.
  • Washing according to the Ilford scheme:
    • 1 inversion - flush
    • 5 inversions - flush
    • 10 inversions - flush
    • 20 inversions - flush
    • 40 inversions - add some dish-washing agent - rest for some minutes - flush
  • Hang to dry.

I previously developed films in caffenol and was surprised by the quality. However, all previous attempts were using C41 color negative films.
The film that hangs drying has got 82 photos on it, yep, I got 10 more exposures as one would expect from a half-frame camera... and the negatives look amazing!
This was the first time in decades I developed a b&w-negative film. I loved to do this when I was a teenager. It seems I rediscovered this love.

Wednesday, July 16, 2014

Chardonnol - Chardonnay as Developer

What gave me that idea?!
Well, very simple, Dirk posted a very interesting article (and video) about developing photo-sensitive paper with red wine and some other stuff.
Have a look: http://www.caffenol.org/2012/06/20/wineol-red-wine-developer/

This inspired me to research a bit myself, which brought me to this page:
http://www.phenol-explorer.eu/contents/graph?compound_id=457&experimental_method_group_id=2&food_id=137&unit_type=weight
Interesting! It seem that chardonnay actually produces the most caffeic acid. Now you know why this white wine always caused you problems!
Don't drink it! Use it as developer!
Some more interesting reading on the topic can be found here:
http://www.skinandallergynews.com/views/cosmeceutical-critique-by-leslie-s-baumann/blog/caffeic-acid/5be431eb4418c47d008ed4d6a9534421.html

Right, let's go to my first ever experiment using chardonnay as developer:

Chardonnol

Recipe:
  • 0.5l cheap Chardonnay
  • 3/4 tea spoon ascorbic acid => measured pH 4
  • 2 tea spoons washing soda => measure pH > 11 (maybe 1.5 tea spoons washing soda will be better)
The soup was brown by now.

X-pro development

I developed a regularly exposed Agfa vista plus ISO 200 (C41 color negative film) for 16 minutes in a Jobo Universaltank 160 Mod.4.
Agitation during the initial 30 secs, than every first 10 secs of a minute.
The result was very very faint, somewhat like the experiment I did with Caffenol-STD and a 10 minutes development (see previous post).
Here is a high contrast frame (dust in the darkroom, dust on the scanner, I even seemed to have managed to scratch the film). One image reflects the file that my Epson V370 produced, the other image was a result of playing with curves in the GIMP.

scan as created by the scanning
curves adjusted using the GIMP


Unlike with the under-developed example shown in the previous post, I was unable to recover any color information from the negative. Maybe the development was even too short for this.


I figure, Chardonnol would be a very good developer for stand development, in particular seen the fine grain it produces. Will try 45min with this recipe next.

Here is another example, low contrast now:
as scanned
curves, brightness and contrast adjusted

This time, I operated at the very limits of image reconstruction. I guess, the vertical lines are actually inside the film material, now visible due to the enormous push by the scanning software and my GIMPing.

Printing those frames (by means of an enlarger) could be a challenge. Asks for grade 5 paper, I guess.

Tuesday, July 15, 2014

Goin' Chemical Again!

Yep, that's write, I am all over with digital (well, sort of) and getting back to photography as I learned it: nasty smells in the darkroom!

Returning from my home-leave, I brought my good old dark-room stuff to my expat-home. Meaning, not only my very own enlarger made the trip, also the developer tank my father used in his youth.

You may ask yourself what is going on! The guy just bought tons of digital gear and now he's talking chemical?!
Right! I caught myself in some sort of nebula myself.

Digital is OK... you take the shot, and process it by means of a software of your liking.
However, were is the soul? The soul of photography, which lives somewhere between the hope of having the shot and the hope of actually getting it (by developing and printing your exposure).

Maybe I am all romantic, dreaming the past... Never the less, having my darkroom stuff around me triggered some experiments.

I bought a couple of disposable cameras. It seems that both came from a "bad" batch, since the base side was badly scratched, as you will see in a sec.

To experiment, I exposed the ISO 400 C41 color films under various situations.  At the end, I developed 1 film for 16min and the other one for 10min.

Cross-processing C41 film in a B&W manner should be done in about 15min, according to the interwebs. My 16min development results is usable negatives (although I have not yet tried to print any of those with my enlarger.
The interesting part comes along with the under-developed C41-film.

This film was developed in Caffenol and later scanned with an Epson V370. From the cross-processed neg, the scanner recovered the color green...

caffenol x-processed color neg
Today I tried to X-develop a film in a mixture of Chardonnay, Vit-C and Soda... One thing is for sure, the negs are not as dark... however, I am not sure if the film developed enough... It's drying now, lets hope for the best,


Saturday, July 5, 2014

Calibrate Your Screen!

Yep, we had that topic before, i.e. using the tools provided by operating system, see post here.
Of course, this is just a start. Despite those methods work pretty well concerning the gamma calibration of your screen, getting the gamut (color space) and white balance right is near impossible.
However, if your are serious about your photography, I actually want to work with a screen that displays colors as good as possible. Right, when doing B&W only, this is probably not of your concern.

Available gadgets
There are a couple of different gadgets on the market, which help you calibrating your screen.  For convenience, i.e. my local photo store, to which I can cycle in just about 10min, had a Datacolor Spyder4Express, which I obtained for a little less than €90. In fact, the Spyder4Express actually does the calibration for me, fully automatically.

Problems may occur!
Sounds all brilliant and easy, but, you will be disappointed at first. You may even consider returning the device claiming warranty for a defective unit. To prevent you from arriving at such considerations, I would like to share a few experiences I had with the device. I will also try to explain a little bit why things happen, when they happen. Although those experiences are based on the Datacolor Spyder4, other devices of similar nature may show similar effects.

Position on the screen
The Spyder4 is supposed to sit snug on you screens surface, so that no light can fall onto its dedicated color sensors. To allow for this position, a counterweight is fit on the USB cord. This weight can be repositioned along the cable.
  • Try to slowly track it into the position which fits your screen best. Apply minimum force possible, after all, you don't want to rip the USB cable apart.
Angle of the screen
In the good old times, monitors were big chunks of roundish glass, making in easy for whatever one dangles in front of it, to make good contact with the bulgy glass surface. However, those days are gone, and so are the rounded surfaces of computer monitors. Today, one owns a very flat bit of (mostly) plastic surface, which sits recessed in a frame of more plastic. Meaning, that in a normal operating position, a device, such as the Spyder4, will not be able to touch the surface in the intended manner.
  • Tilt your screen upwards, as far as needed (or a little more). This allow the color calibration gadget to actually reach the screen's surface.
Stray light
Datacolor, and other probably too, warns about light falling directly onto the screen during calibration. While this is a nice move, it seems to rather pointing back in time, when the display light was actually generated by a beam of electrons hitting a phosphorous layer at the inner surface of the goldfish bowl. We came to the conclusion that those days are over, right?
So, what is wrong with the advice? It is by far insufficient to not point a light source onto the screen during calibration.
Here is why: modern displays employ light guides, to guide white light (from the screen's light source) to individual cells containing liquid crystal materials. Although not intended to, some minimal amount of ambient light may be collected by the monitors surface, to be re-emitted through the screen, interfering with the calibration run. This actually happened to my. Different color if indirect ambient light resulted in different calibrations.
  • Darken the room in which you calibrate your monitor before doing so!
Green cast
This is reported on the interwebs, and it hit me too. I figure, the problem is caused by 2 factors: 1) ambient light interference and 2) angle of view when using the screen.
Concerning the first point, see the stray light problem. Now imagine that you calibrate your screen in your study, normal dim lights around you, e.g. incandescent bulbs... this is warm light, the calibration process pics up traces of that light an corrects for by shifting towards green.  Try the following: set your digital camera to a white balance for incandescent light and take a photo in bright sunlight... it will be green!
Concerning the second point, the calibrated monitor forces you to stare at it at the angle of calibration. Why is that? In the good old days, having your goldfish bowl on your desk, any individual pixel radiated the same color into any direction, nothing was polarized. Today's screens, however, are entirely based on polarized optics. Polarization is a tricky thing to deal with, hence, I will not go any deeper into the whys and what photons do anyway. Instead I wish to invite you to do a quick experiment: create a white surface on your screen, e.g. by starting a text processor, now look at the screen at various angles from above and below. I am using a relatively inexpensive PHILIPS LC-display, on which I can observe a shift from whit to green, when looking at the screen from below, and a shift from white towards blue/violet, when looking from above. BTW: right-left, on my screen at least, creates a red color cast. Back to the color calibration gadgets, those are designed to measure the emissions of the screen exactly perpendicular to the screen's surface thereby defining the angle in which the screen emits the correct colors.
  • Position your screen such that you look at it at an angle of 90˚.
Observation
It seems that a slight blue cast is more acceptable than a green cast, at least to me that is. Interestingly enough, all calibrations I have done so far seem to shift away from blue. I guess manufacturers want to avoid costumers to complain about greenish displays and therefore shift their color space towards blue.

All in all, I believe everyone working with visual content should calibrate their displays. Consumer level gadget are really inexpensive, seen what can be achieved... definitely worth their money.


Monday, June 23, 2014

RAW or not RAW, that is the Question

If you would have asked me that question some months ago, the stereotypical answer would have been: RAW!
You may read a certain doubt between the lines, which however is only true under very specific circumstances.
I am a big fan of shooting photos in raw format and treating those in RawTherapee, DarkTable and Lightroom. Raw data, i.e. data as recorded by the sensor, gives a huge advantage in post processing, since nothing is compressed (read: thrown) away.

As a regular reader, you may recall an earlier post about the Canon IXUS 140 used in raw, to great success, while jpg images, processed in-camera, had the edge concerning distortion.
As a matter of fact, the in-camera correction could always be applied to the raw image by use of post processing software.

However, everything changed with the purchase of the Fujifilm X100S!
The X100S not only comes with an enhanced sensor, with the XTRANS filter array, it also improves the sharpness of the JPG-image by using information about the 23mm prime lens of the camera.
What does that mean? As soon as a focal condition is established, the entire optical system is known. That is exactly what Fuji uses in the JPG converter algorithms.

Presently, such algorithms are not implemented in any software able to deal with XTRANS raw-files.

And here is the dilemma:
  1. Shooting in RAW allows me for tweaking the files in terms of exposure.
  2. Shooting in JPG gives the full advantage of Fuji's JPG converter.
Of course, the primary answer is simple: Write both file to the memory card and use which ever one is better! That's what I am doing right now.

Fuji took it a step beyond: RAW-photos can be tweaked in-camera and exported to JPG using the lens data to increase resolution. I have not done this yet, folks on the interweb write that being a really fiddly procedure.

To answer the question I posed in the title: use RAW when using any camera other than the X100S.

When using the X100S, you want to record both, the raw and the jpg. Make sure to have all parameters for jpg set to your likings and exposed spot on. If exposure is spot on and all the settings are ideal, the jpg image might actually be much better than the raw with all tweaking attempts... but only then!

Have a look at a screen capture that shows both (click to see on full resolution),  the jpg on the left and the raw on the right:
JPG vs RAF (raw)

Just in this particular case, i.e. the Fuji X100S, I will primarily use the JPG-file, for its enhanced sharpness.

Up to now, with any other camera I own, I would prefer the raw file!


Sunday, June 15, 2014

Exposure w/o Metering - Part 6

Today was a mixed bag of light, i.e. very clear and also cloudy skies, in sometimes rapid succession.
Hence, I went out to photograph the shadows. I was talking about in the last post. What the day did not provide me with, at least not during the time I was hunting shadows, was a full (bright) overcast. Of the 3 promised conditions, we are therefore missing one.

Down to business. You will see that my subject will not deserve a place in a gallery, however, I believe several effects of bright sunlight versus light overcast can be easily demonstrated.

The first image refers to shadows cast by unobstructed sunlight. When this short of shadows can be seen, the sunny 16 rule applies, i.e. stop down to f/16, shutter speed = s/ISO.
hard light (direct sun) casting sharp shadows and a high contrast image

The second image show sunlight shining through a thin layer of clouds. This is the condition when you want to open up the aperture to f/11.
soft light (light clouds) washing out the shadows
You might notice that the upper image has a much warmer overall tone. This is actually created by the dominance of the direct sunlight over the blue-sky ambient light. In the second image, the ambient light starts to take over filling the scene with blue light, hence the colder color tone.

Another thing to learn here. the total amount of light present in the shadows (in theory) is identical and caused only by the ambient light, i.e. the blue sky. Why did a write in theory? Very simple, in real life reflections, e.g. from buildings, cars, etc., can occur. It is fair to say, I believe, that in the above images, real life meets the theory pretty well.

For techies under my readers, the following remark. Both shots are taken with the X100S in aperture priority, so that the images are technically correctly exposed. Also, I used RAW files, thereby preventing color temperature correction influencing the outcome.

Finally, for the f/8 condition, just imagine that there is no shadow cast at all, and all you see is pavement and dirt, even more blue-ish.

Concluding, to understand the illumination, watch the shadows!

Exposure w/o Metering - Part 5

Up to now, I was referring to a clear blue sky and direct sunlit scenes. Can we use the "sunny 16" rule under conditions other than sunny?
Yes, no problem at all!

Let's assume that for this discussion, it is mid-day and we are photography a frontlit scene. Also, we don't care about the D.o.F for the time being.

In full sunlight, as the rule suggest, we are now photographing with an aperture of f/16. This is very hard light, throwing very sharp shadows. Hence, whenever you see very clear and sharp shadows,  you should consider using f/16. BTW, this light would be referred to a hard light.

With a light cloudy sky, the direct sunlight is somewhat attenuated and the contribution of scattered light increases. Shadows are a bit washed out under such lighting conditions. When I say washed out, I refer to clearly visible, having blurry soft edges. To compensate for this drop in illumination, we need to open up to f/11.

When the sky is heavily overcast, but still bright, w/o any direct sunlight, the only natural source of illumination is scattered light. Scattered light comes from all direction, hence, no shadows will be present. This lighting condition is referred to as soft light and would require to open up one stop to f/8.

With a rainy sky, a lot of light is absorbed. I figure it is not necessary to detect this condition by looking at shadows... to me the best indicator of rain is getting wet. The mentioned loss of light due to absorption requires us to yet again open up one stop to arrive at f/5.6.

Somewhat obvious, in heavy rain, we would yet again open up one stop to f/4. However, I figure it is pretty rare to go out shooting under such weather conditions.

I hope to be able to shoot some frames showing the different shadows of the first 3 conditions mentioned above. If so, I will show those in a future post.

Exposure w/o Metering - Part 4

In the last part, I had a look at the influence of the incident illumination angle. To prevent the post from getting too long, I essentially skip the explanation why that is.
However, since this is one of the more important things to the sunny 16 rule, I would like to pick up the topic once again.

The basic principle behind the angle of incident light can be illustrated by the phases of the moon.
Please have a look, e.g. on this web-page.

0˚ between illumination and line of sight
If the sun is directly behind us, and the moon is directly in front of us, that would be full moon. In this phase we all the sunlight shining on the moon.

±90˚
If the sun is on either side of us, this happens during the first and third quarters of the moon, very obviously, we see only half the light illuminating the moon.
In terms of photography, reducing the amount of illumination by half reflects 1 f-stop. To compensate for this lost stop, we need to open the aperture by one stop, or double the exposure time.

180˚
When we are actually looking into the light source, the analogy to the phases of moon starts to become a little weak. The reason for that is, that we can't see any of the sunlight illuminating the moon, still the moon is somewhat visible, due to earth-shine. Earth-shine is the sunlight that the earth reflects, which then illuminates the moon. As I said, this is when the analogy phases out.
However, we still can learn something about illumination of a scene in photography.
In earth, we are surrounded by an atmosphere, which itself scatters light. This scattered light is the illumination of a scene shot under backlit conditions. Of course, scattered light is less intense than direct light. To compensate for this, we need to further open the aperture.
This, of course, only holds true if details of a scene are to be photographed. For a backlit profile photo, the exposure has to be set to match the brightness of the light source, i.e. stopping down the exposure, rather than open it up.


Saturday, June 14, 2014

Exposure w/o Metering - Part 3

In the earlier parts of the series about determining exposure w/o metering, I kept a relatively theoretical approach to the effects of illumination, i.e. luminosity.
In this post, I will cover another aspect of luminosity, however, this time I will provide some real life examples.

Previously I wrote about the influence that time and latitude have on the rule "sunny 16". In this post, I will have to make use of the influence that local time.

For taking the following images, I went out later than 6pm local (MEST), therefore, I opened the aperture by 1 stop to f/11.
The 3 following photos were taken from the very same spot, with an essentially cloudless sky, and the camera set to s/250 and ISO250. Please observe the shadows to determine the direction of light.

0˚, f/11, s/250, ISO250, front lit

90˚, f/8, s/250, ISO250, side lit

180˚, f/5.6, s/250, ISO250, back lit

In the last photo, you may notice the lens flair, which was created by shooting into the glaring sun.

You will notice that the mid-ground (the trees) is perfectly exposed in all three photos. Of course the highlights will be blown out when shooting into the light... no surprise here.

Comparing the 0˚ and the 90˚ photos, you will notice the balance of the tree's highlights and shadows are the same, while contrast and highlights are more pronounced at the 90˚ shot. At 180˚, the contrast is somewhat "back to normal", when accepting the blown out highlights.
There is also a noticeable difference in the exposure of the sky. At 0˚, the sky is exposed the darkest. Since the brightness of the sky is independent from the scene, when opening up at 90˚, the sky portion of the image receives more light and is therefore brighter in the photograph. (At this angle, a blue sky can be recovered by use of a polarizing filter, which I will discuss in another post sometime later.)

Concluding: use the sunny 16 rule when shooting front-lit scenes. Open up 1 stop for side-lit scenes, and 2 stops for back-lit scenes.

I hope that this brings you a bit closer to understanding exposure and lighting under given circumstances.

In future parts of this series I will explain how to determine the illumination under circumstances other than an open blue sky.

Exposure w/o Metering - Part 2

In part 1, I discussed the rule "sunny 16" and the possibilities opened by variations of the rule according to the use of aperture stops combined with shutter speeds.

In this part, I would like to introduce the first constraints to the rule, at least what I believe to be the first constraint: time of day (actually, the interweb in pretty silent about this topic) and time of year.

As mentioned in part 1, sunny 16 applies to mid day, i.e. when the sun is the highest.
Since today, everything is available world-wide, I would like to add that this statement holds true only to a certain range of geographical latitudes! Actually, my understanding is, that the sunny 16 rule is a rule valid for latitudes between about 30˚ - 60˚ N/S.

To my understanding, the rule is all about taking pictures of your family during summer vacation. The rule reflects the amount of illumination available to the scene.

As a physicist, I would like to inform you about the hardness of sun light, i.e. light being collimated, in other words, the light rays are all parallel.
At a perpendicular angle of incidence, the light rays are closest to one another, meaning the illumination (light yield) is at a maximum.
At an angle parallel to the incidence of the light, the illumination is minimal.

Confused?! Take an orange and put it in sunlight. You will observe that the level of illumination drops, dependent on the angle of illumination.

The same happens on Earth. Dependent on the time of day, the sun will illuminate the earth's surface more or less, that's the influence of the longitude. The same holds for the latitude, although this changes with the time of year.

I figure, when traveling, one has to adapt the sunny 16 rule according to the latitude and the time of year.

I would do the following in general:
  • latitudes between 0˚ and 30˚: stop down by one stop
  • latitudes between 60˚ and 90˚: open up by one stop
  • in spring/autumn, between 6:00 and 9:00 local time: open up by one stop
  • in spring/autumn, between 15:00 and 18:00 local time: open up by one stop
 Of course, this needs adaption depending on the longitude.

Remember, I still talk write about a front-lit scene.
 

Exposure w/o Metering - Part 1

This will be a multi-part story about the technique of taking properly manually exposed photographs without the use of any light metering device.

30+ years ago, I heard about the technique called "sunny 16". However, being relatively young that time, with film being expensive and a heavy burden on my pocket money, I did not dare to use it, in particular since I was mainly shooting color slide film, which demands spot on exposure.
Consequently, I bough a relatively inexpensive light meter, a "Gossen Bissix 2" which did a great job, I still have it to the present day.
The light meter was used essentially only to measure the illumination, not the light reflected from the scene, thereby being independent from the color/brightness of the scene itself. Actually, I bought the light meter for exactly that, not sure if I used it ever for metering the scene itself.

Although the light meter did a great job, it costs additional time to take an accurate meter reading. Some shots were gone before the lighting was determined. To the time of expensive film, I thought "tough luck, no photo now, more luck next time"...

Today, I do not rely on pocket money any longer, I got my own income now ;-) So I decided to finally buy a camera which is able bring back the good old manual times, Fujifilm's X100S. The X100S is probably the best camera I ever owned, for sure it is the best compact point&shoot available on the market, which is definitely reflected by it's financial resistance, being somewhat a short circuit in the wallet.  Right, today, I could even afford to shoot more film, but where can you buy film today?!

Back to the topic: the "sunny 16" rule.

Exposure
The rule is pretty simple:
  • On a sunny cloudless day,
  • mid day between 9am and 3pm local time,
  • the exposure time is the inverse of the ISO sensitivity
  • at an aperture of f/16
  • when the sun is directly behind the photographer.
What does that mean? In essence, this is what a light meter does, when used for measuring the illumination of a scene. A light meter, with the diffuser/filter closed, pointed at the sun a mid day on a cloudless day, should read f/16 for 1s/100 with an ISO of 100. In the film days, ISO100 was a pretty normal film to use. A shutter time of s/100, however, did not exist. The closest to s/100 is s/125, which consequently is the shutter speed in this example.

However, there might be adaptations to this rule, e.g. if you wanted a shallower depth of field. Using an aperture of f/16 creates a very wide D.o.F., which is good for landscape photos, but may ruin a portrait. With a camera of those days, the shortest shutter time was s/1000, which would reflect an aperture of f/5.6 for an exposure equivalent to the example above, creating a shallower depth of field however.

Depth of Field
In general, whenever you need to open the aperture by 1 stop, the exposure time needs to be divided by 2.
  • f/16 - s/125
  • f/11 - s/250
  • f/8 - s/500
  • f/5.6 - s/1000
The above aperture exposure time pair will result in the exact same exposure of the image, however, the depth of field will be very different.

So far, so good. I will end this post here, w/o any example pics...

Some of the constraints metioned, I will write about in further parts of this series. I also intend to show examples shot with the X100S with manual settings.

For now, I would like you to absorb the rule "sunny 16" and the equivalence in exposures.